Android App Development - Using The ActionBar Widget
Introduction
I'm starting down the long journey of learning how to develop applications for Android devices. Since I've been developing Java applications for several years and am very familiar with Eclipse, Android app development seemed to be the best fit.
I've targeted my learning on Android Ice Cream Sandwich (version 4.0.3) platform. Though almost no handsets and tablets currently (December 2011) use Ice Cream Sandwich, I'm hopeful that by the time I'm ready to put an app on the Android marketplace, it will be more common.
One of the first techniques I need to learn is how create the user interface for the app. I've got some experience with Java Swing, but most of my applications are either for the web or for daily batch jobs that don't really have a user interface.
A new user interface widget is the ActionBar. This widget was introduced in Android 3.0 and further enhanced in Ice Cream Sandwich. I used the web sites cited in the Reference section below to learn how to employ ActionBar in my app. Since there did not seem to be very many tutorials out there concerning how to use ActionBar, I thought a blog article might be useful to other new Android app developers.
Example Application
You can download a zipped Android project. Using Eclipse's import feature you should be able to import the source code into your own Eclipse IDE. If you don't use Eclipse, just unzip the download and you can open the files in any text editor.
This tutorial assumes you're familiar with basic Android app development. If not, visit the Android Developer's website.
Action Bar
Using the ActionBar widget allows you to have MenutItem objects appear along with your application title at the top and/or bottom of the view. For example:
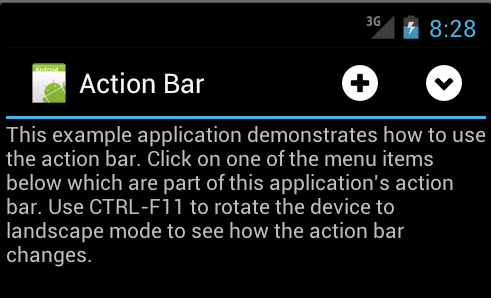
The images to the right of the application title (Action Bar) are MenuItem objects that a user can click on to perform application tasks. The images may have text associated with them, but if the OS determines that there is not enough room, the text will not show.
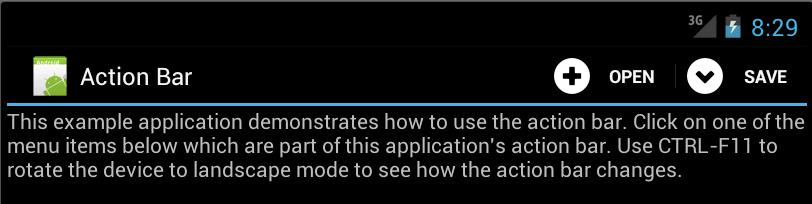
If the user rotates the device to landscape mode, the action bar may include the image and associated text as there is now more horizontal room. For example:
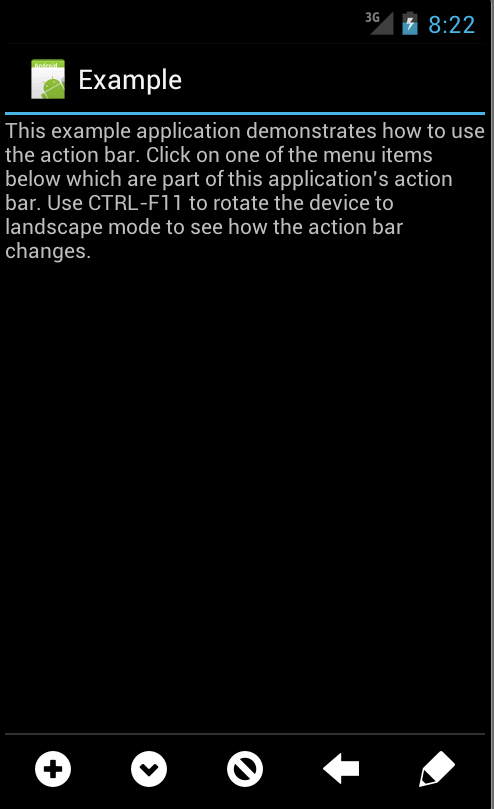
If you have several MenuItems you'd like to display as part of the ActionBar then it may be a good idea to use a new ActionBar feature introduced in Ice Cream Sandwich: android:uiOptions="splitActionBarWhenNarrow". This will have the platform put the ActionBar MenuItems at the bottom of the view if it cannot fit them all on the top. For example:
Setting Up ActionBar
In the example application is this code, stored in mainmenu.xml (res/menu folder).
<?xml version="1.0" encoding="utf-8"?>
<menu xmlns:android="http://schemas.android.com/apk/res/android" >
<item android:id="@+id/open" android:showAsAction="ifRoom|withText" android:title="Open" android:icon="@drawable/ic_action_open"></item>
<item android:id="@+id/save" android:showAsAction="ifRoom|withText" android:title="Save" android:icon="@drawable/ic_action_save"></item>
<item android:id="@+id/close" android:showAsAction="ifRoom|withText" android:title="Close" android:icon="@drawable/ic_action_close"></item>
<item android:id="@+id/history" android:showAsAction="ifRoom|withText" android:title="History" android:icon="@drawable/ic_action_history"></item>
<item android:id="@+id/settings" android:showAsAction="ifRoom|withText" android:title="Settings" android:icon="@drawable/ic_action_settings"></item>
</menu>
The android:showAsAction attribute specifies that the MenuItem should be included in the ActionBar. There are several values you may use for this attribute, so consult the references below. In the example, I used "ifRoom|withText". This value means show the MenuItem in the ActionBar if there is room and also show the text associated with the MenuItem. If there is not enough room to show all the MenuItems in the ActionBar, then those MenuItems not displayed will be shown when the user clicks on the menu button of the device.
The MenuItems are setup by when the application is loaded and executes this method:
public boolean onCreateOptionsMenu(Menu menu) {
MenuInflater inflater = getMenuInflater();
inflater.inflate(R.menu.mainmenu, menu);
return true;
}
Handling A User Click
When a MenuItem in the ActionBar (or in the normal menu) is clicked, method onOptionsItemSelected is called. In the example application, I'm just displaying a short message to the user:
public boolean onOptionsItemSelected(MenuItem item) {
Toast.makeText(this, "MenuItem " + item.getTitle() + " selected.", Toast.LENGTH_SHORT).show();
return true;
}
Summary
Using the ActionBar widget as part of the user interface for an Android app targeted at devices running 3.0 or higher looks like a good practice. Use the references below to learn more about ActionBar, as there is much more you can do with ActionBar.
References
- Android Developer's Guide, Action Bar
- Android Developer's Guide, Menu
- Android 4.0 Development Tutorial, Menu and Action Bars
- Android API, ActionBar Class
- Android API, MenuItem Class
- Android Asset Studio, Action Bar Icons
- Action Bar Example App

thanks for putting in the effort.
regards